I created the PowerShell module AzPolicyTest (GitHub, PowerShellGallery) back in 2019. This module provides a list of Pester tests can be used to validate the Azure Policy and Initiative definitions. It can also be used in your IaC pipelines. I have previously blogged about this tool in the blog post Deploying Azure Policy Definitions via Azure DevOps (Part 2).
The initial version 1.0 was developed using Pester v4. It has been 5 years and it has stopped working long time ago due to the breaking changes introduced in Pester v5. On the other hand, a lot of new capabilities have been introduced in Azure Policy since 2019. I have been wanting to update this module for a long time, but I just never got around to it.
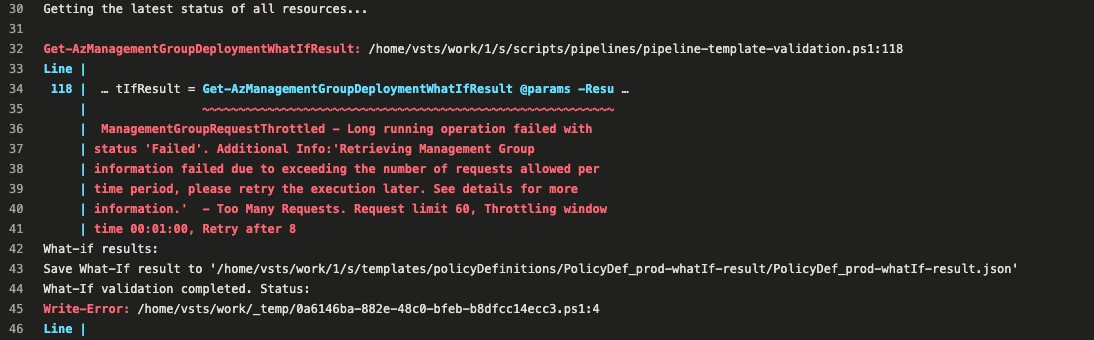
My intention for creating this module is to collect all the best practices and lesson learned from the field and put them into a set of Pester tests. I wanted to make it easy for anyone to validate their policy definitions and initiatives before deploying them (the shift-left approach). Some of these tests addressed issues that a normal Bicep template validation would not catch and are can only be identified during the deployment phase (for example, the mode
value is case sensitive and it must be using the pascaleCase
format? All
and Indexed
are accepted but all
or indexed
are not?).
I have manage to spend a day to update the module to use Pester v5 and also added a few new tests to cover some of the new Azure Policy capabilities. The new version 2.0 has been released to PowerShell Gallery. You can install it using the following command:
Install-Module -Name AzPolicyTest -Force
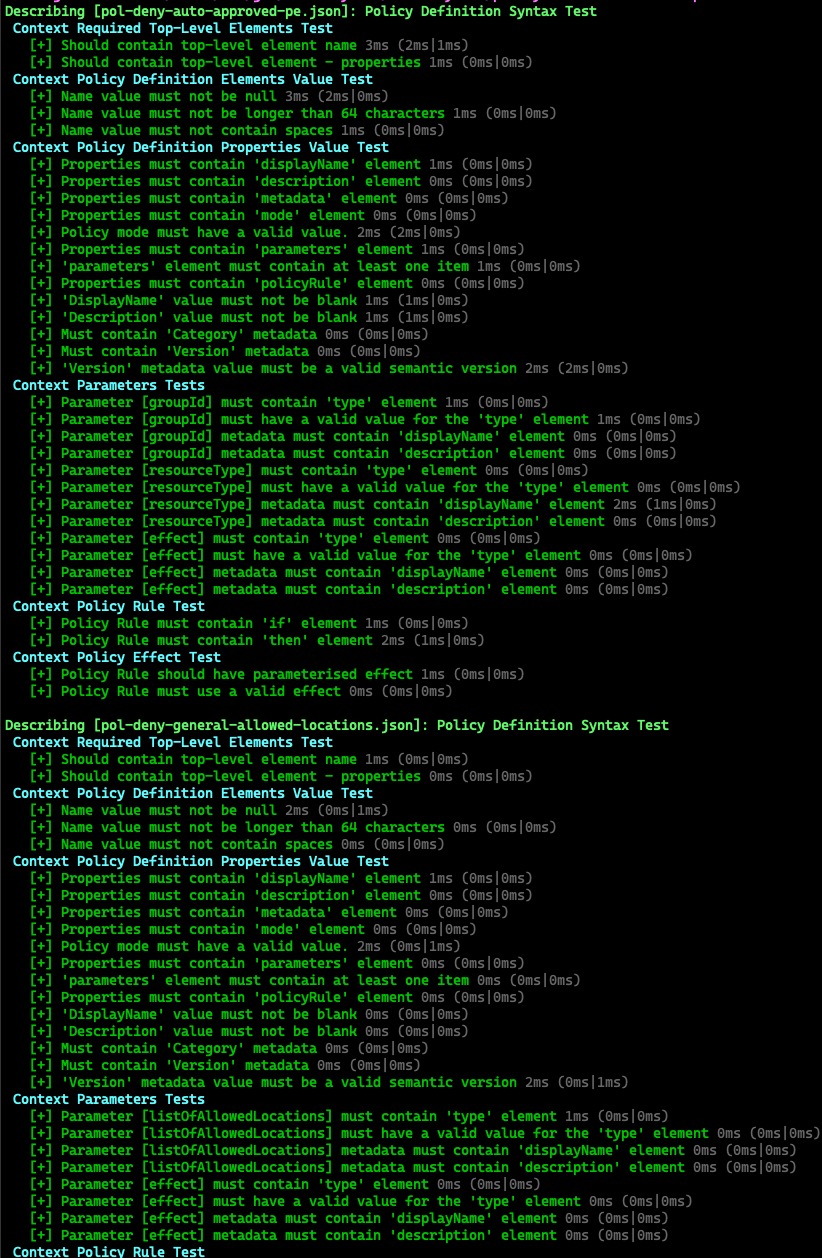
You can use the following commands to run the tests:
Invoke tests for Policy Definitions:
#import the module if required
import-module AzPolicyTest
# Test a single policy definition file without generating the test results output file
Test-AzPolicyDefinition -Path "path-to-policy-definition-json-file.json" -OutputFile "C:\Temp\MyTestResult.xml"
# Test all policy definition json files in the directory and sub directories and store the test results in a file
Test-AzPolicyDefinition -Path "directory-path" -OutputFile "./policy.tests.xml"
Invoke tests for Policy Initiatives:
#import the module if required
import-module AzPolicyTest
# Test a single policy initiative file without generating the test results output file
Test-AzPolicySetDefinition -Path "path-to-policy-definition-json-file.json" -OutputFile "C:\Temp\MyTestResult.xml"
# Test all policy initiative json files in the directory and sub directories and store the test results in a file
Test-AzPolicySetDefinition -Path "directory-path" -OutputFile "./policy.tests.xml"
The following Tests are included in the module:
Policy Definition Tests:
name
element should existproperties
element should existname
value must not be nullname
value must not contain spacesdisplayName
element should existdisplayName
value must not be nulldescription
element should existdescription
value must not be nullmetadata
element should existmetadata
must contain Category
elementmetadata
must contain version
elementversion
value must be a valid semver versionmode
element should existmode
element must have a valid valueparameters
element should existparameters
element must have at least one itempolicyRule
element should existpolicyRule
element must have a if
and then
child elementDisabled
effect as one of the allowed valuesAudit
, then it should also contain Deny
and vice versaDeployIfNotExists
, Modify
and AuditIfNotExists
policy definitions should contain a details
elementDeployIfNotExists
and AuditIfNotExists
policy definitions should contain a existenceCondition
elementDeployIfNotExists
and AuditIfNotExists
policy definitions should contain a evaluationDelay
elementDeployIfNotExists
policy definition should contain a deployment
elementDeployIfNotExists
policy should set the deployment mode to Incremental
DeployIfNotExists
and Modify
policies should contain a roleDefinitionIds
elementDeployIfNotExists
and Modify
policiesDeployIfNotExists
policy should have a valid schemaDeployIfNotExists
policy should have a valid contentVersionDeployIfNotExists
policy should have a parameters
, variables
, resources
and outputs
elementsModify
policies should contain a conflictEffect
element and it must have a valid valueModify
policies must have an operations
elementPolicy Set Definition (Initiative) Tests:
name
element should existproperties
element should existname
value must not be nullname
value must not contain spacesdisplayName
element should existdisplayName
value must not be nulldescription
element should existdescription
value must not be nullmetadata
element should existmetadata
must contain Category
elementmetadata
must contain version
elementversion
value must be a valid semver versionpolicyDefinitions
element must exist and must contain at least one itempolicyDefinitionGroups
element must exist and must contain at least one itempolicyDefinitionId
and policyDefinitionReferenceId
elementspolicyDefinitionId
and policyDefinitionReferenceId
elements for each member policy must have a valid valueparameters
elementgroupNames
elementgroupNames
element for each member policy must have at least one itemJson File Tests:
path
parameter must contain at least one Json fileI have also bumped the minimum required PowerShell version to v7.0.0 and Pester module version to v5.5.0. Therefore you will no longer be able to use this module in the legacy Windows PowerShell (v5) environment (and if you are still using Windows PowerShell, you should really stop doing that!).
I have in included few policy and initiative definitions that I used for testing the PowerShell module. you can find them in the GitHub repo under the test_definitions folder.
Lastly, I wanted to mention that I was thinking about adding additional tests to validate the policy definition json file against the official JSON schema for Azure policy definitions. However I quickly scrapped the idea due to few limitations:
Test-Json
cmdlet has been updated to use the latest Json schema draft-7 format (breaking changes in PowerShell 7.4.1). Therefore the official schema for Azure policy definitions is no longer compatible with the latest Test-Json
cmdlet.policyRule
section of the policy definition, and there is no schema for the policy initiatives.[parameters('effect')]
is not a valid value according to the schema, but it is a valid in the policy definition as long as the respective parameter is correctly defined.If you have any suggestions or feedback, please feel free to raise an issue in the GitHub repo or each out to me on social media. I hope you find this module useful.
]]>I have used the Common Azure Resource Modules Library (CARML) modules for Azure Policies in several projects. I have seen few customers ran into limitations with the policy modules, especially the modules for policy definition and initiatives.
When using the CARML modules for policy definitions and initiatives to deploy custom policy definitions, in your Bicep template, you would call the module for every single definition. As we all know, in Bicep, every time when you call a module, it becomes a nested deployment. This means if you have 100 policy definitions to deploy, you will end up with at least 100 nested deployments.
Although custom policy definitions and initiatives can be deployed to subscriptions or management groups, it’s most commonly deployed management groups.
As we all know, the deployment limit for management groups is 800 per location (reference). Unlike the subscription level deployments, when you reach the limit on a management group, the older deployments are not automatically deleted. This means you will need to manually delete the older deployments to make room for new deployments.
This has become a real issue for customers who have a large number of custom policy definitions and initiatives to deploy. I have seen customers’ policy pipelines frequently fail due to the deployment limit being reached. One of my customers was even thinking about moving away from the existing Bicep pipeline and adopting Terraform for the policy deployment so it is not restricted by the management group deployment limit.
To reproduce this issue, I have created a pipeline that deploys around 150 custom policies to a management group using the CARML policy definition module for the management group scope. The pipeline also runs a what-if template validation before the actual deployment. My pipeline actually failed at the what-if validation stage due to the ARM throttling limit being reached.
To work around this issue, I had to significantly reduced the number of policies deployed from the Bicep template and I was able to pass the what-if validation stage and managed to have all the policies deployed. In the Azure portal, there is a separate deployment for each policy definition:
This issue is actually pretty easy to fix. Instead of calling the module for each policy definition, we can simply update the policy definition and initiative modules to support deploying multiple resources. It means the for loop
takes place within the module instead when calling the module (in the Bicep template).
I have updated the policy definition and initiative modules to support deploying multiple definitions. The updated modules are available in my GitHub repo HERE:
These modules are based on the original CARML modules, with the following enhancements:
for loop
for each resource).To test the updated modules, I have updated the existing templates to deploy the same 150 policy definitions, not only I was able to pass the what-if validation stage, but also the deployment was successful. There were only 3 deployments created in the management group:
There are 3 deployments because I have called the wrapper “all scope” module, which then called the management group scoped child module. all 150 policy definitions were created from the module call for the child management group scoped module:
I have also included the Bicep templates I have used in my lab environments for the policy definition and initiative deployments in the GitHub repo. You can find the templates here:
As the standard, the Azure policy definitions are defined in JSON files. I have included few sample policy definition JSON files in the same directory of the policy definition Bicep template.
I firstly import the JSON content of each policy file into an array variable using the loadJsonContent()
funciton in Bicep.
var policyDefinitions = [
loadJsonContent('relative-path-to-the-json-file-1.json')
loadJsonContent('relative-path-to-the-json-file-2.json')
]
Then I created another array variable to format the json object into the user-defined type for the policy definition which is defined in the module. This is done using the lambda function map()
:
var mappedPolicyDefinitions = map(range(0, length(policyDefinitions)), i => {
name: policyDefinitions[i].name
displayName: contains(policyDefinitions[i].properties, 'displayName') ? policyDefinitions[i].properties.displayName : null
description: contains(policyDefinitions[i].properties, 'description') ? policyDefinitions[i].properties.description : null
metadata: contains(policyDefinitions[i].properties, 'metadata') ? policyDefinitions[i].properties.metadata : null
mode: contains(policyDefinitions[i].properties, 'mode') ? policyDefinitions[i].properties.mode : 'All'
parameters: contains(policyDefinitions[i].properties, 'parameters') ? policyDefinitions[i].properties.parameters : null
policyRule: policyDefinitions[i].properties.policyRule
})
Lastly, I simply called the Policy Definition module using the formatted array mappedPolicyDefinitions
as the parameter:
module policyDefs '../../BicepModules/authorization/policy-definition/main.bicep' = {
name: take('policyDef-${deploymentNameSuffix}', 64)
params: {
policyDefinitions: mappedPolicyDefinitions
}
}
The policy initiative template is very similar to the policy definition template, but a little bit more complicated because the policy initiatives are depended on the policy definitions. In my lab (and my customers environments), I have been creating the custom policy definitions and initiatives in a same management group.
Normally when referencing a policy definition in an initiative, you will need to specify the resource Ids of the policy definitions that are part of the initiative. I didn’t want to hardcode the resource Ids because they are different in each environment. I had to keep the template as generic as possible. Therefore I have placed a token string in all the policy initiative definition JSON files and then replaced the token in the Bicep template using the Bicep replace()
function.
I have included couple of sample policy initiatives that are made up using some of the policies deployed by the policy definition template. These policy initiative definitions are also defined as the standard Initiative JSON format in json files. they are placed in the same directory as the policy initiative Bicep template.
Again, I firstly load the json content of all the policy initiative files into an array variable using the loadJsonContent()
function:
var policySetDefinitions = [
loadJsonContent('relative-path-to-the-json-file-1.json')
loadJsonContent('relative-path-to-the-json-file-2.json')
]
then following the same practice, I used the lambda function map()
to format the json object into the user-defined type for the policy initiative which is defined in the module. However, in this case, I had to nest another map()
function to replace the token string {policyLocationResourceId}
with the management group Id in the policy initiative definitions:
var mappedPolicySetDefinitions = map(range(0, length(policySetDefinitions)), i => {
name: policySetDefinitions[i].name
displayName: contains(policySetDefinitions[i].properties, 'displayName') ? policySetDefinitions[i].properties.displayName : null
description: contains(policySetDefinitions[i].properties, 'description') ? policySetDefinitions[i].properties.description : null
metadata: contains(policySetDefinitions[i].properties, 'metadata') ? policySetDefinitions[i].properties.metadata : null
parameters: contains(policySetDefinitions[i].properties, 'parameters') ? policySetDefinitions[i].properties.parameters : null
policyDefinitionGroups: contains(policySetDefinitions[i].properties, 'policyDefinitionGroups') ? policySetDefinitions[i].properties.policyDefinitionGroups : null
policyDefinitions: map(range(0, length(policySetDefinitions[i].properties.policyDefinitions)), c => {
policyDefinitionReferenceId: contains(policySetDefinitions[i].properties.policyDefinitions[c], 'policyDefinitionReferenceId') ? policySetDefinitions[i].properties.policyDefinitions[c].policyDefinitionReferenceId : null
policyDefinitionId: replace(policySetDefinitions[i].properties.policyDefinitions[c].policyDefinitionId, '{policyLocationResourceId}', managementGroupId)
parameters: contains(policySetDefinitions[i].properties.policyDefinitions[c], 'parameters') ? policySetDefinitions[i].properties.policyDefinitions[c].parameters : null
groupNames: contains(policySetDefinitions[i].properties.policyDefinitions[c], 'groupNames') ? policySetDefinitions[i].properties.policyDefinitions[c].groupNames : null
})
})
Lastly, same as the policy definition template, I called the Policy Initiative module using the formatted array mappedPolicySetDefinitions
as the parameter:
module policyInitiatives '../../BicepModules/authorization/policy-set-definition/main.bicep' = {
name: take('policySetDef-${deploymentNameSuffix}', 64)
params: {
policySetDefinitions: mappedPolicySetDefinitions
}
}
I have decided to publish these 2 updated modules in my own GitHub repo instead of trying to contributing back to the CARML or AVM projects because I am not sure if CARML team will accept this non-standard change. And since CARML is being transitioned to AVM at the moment, the policy related modules have not been transitioned or planned for AVM according to the AVM website. From the website, I was not able to find if an AVM module owner has been identified for the policy modules (and I cannot put my hand up to own these modules because the module owners for AVM must be Microsoft FTEs).
I hope these updated modules will help you to deploy custom policy definitions and initiatives more efficiently. Feel free to reach out to me if you have any questions or feedback.
]]>Most of my work over the last couple of years has been focused on Azure Bicep and more specifically, CARML(Common Azure Resource Modules Library). I have presented this topic in various occasions (i.e. on the AzureTar’s YouTube Channel, and at Experts Live Australia 2023). I have also made several contributions to the CARML project.
In the YouTube videos and the Experts Live talk, I have teamed up with Ahmad Abdalla (@ahmadkabdalla) and Jorge Arteiro (@JorgeArteiro) and covered the concept and benefits of developing your own “overlay” Bicep modules based on CARML modules.
The CARML projects have been superseded by the new Azure Verified Modules (AVM) initiative, and to date, 86 CARML modules have already been migrated to AVM. AVM is a collection of fully tested and verified Azure Bicep modules that can be used to deploy Azure resources. The source code of these modules are located in the Azure Bicep Registry Modules GitHub repo.
Recently I have been working with the Microsoft AVM team to contribute to the AVM project.
Now having the AVM modules in the picture, it has become even easier to develop your own customized overlay modules with AVM because you do not need to locally host CARML modules in an Azure Container Registry (ACR) anymore - since all the AVM modules are hosted in the public Azure Bicep Registry.
When comes to creating Network Security Group (NSG) rules, I actually think the Azure portal UI is pretty simple and easy to use. However, when it comes to creating them in Bicep / ARM or the API, it can be a bit tricky. There are many different parameters for the source and destination all depending on the use cases. Based on the Bicep documentation for NSG, the following parameters are available for the securityRules
property:
Service Tag
.A lot of people find this annoying when creating NSG rules in code. Few years ago, few colleagues and I have created a simplified Terraform module for NSG rules leveraging Regular Expression (Regex) to determine the source and destination. I have been thinking about creating a similar module for Bicep for a while. Although it is not the same as what we did with Terraform (because Bicep doesn’t support Regex at this stage), it is a lot simpler than the standard Bicep / ARM template.
For Example, This is how you can use the module to create a NSG rule:
// ranges of addresses and ports
{
name: 'inbound-rule-allow-1'
access: 'Allow'
description: 'Tests Ranges'
destination: [
'10.2.0.1'
'10.3.0.0/16'
]
destinationPort: [
'90'
'91'
]
direction: 'Inbound'
priority: 210
protocol: '*'
source: [
'10.0.0.0/16'
'10.1.0.0/16'
]
sourcePort: [
'80'
'81'
]
}
// service tag and single port
{
name: 'inbound-rule-allow-2'
protocol: 'Tcp'
sourcePort: [ '*' ]
destinationPort: [ '6666' ]
source: [ 'VirtualNetwork' ]
destination: [ 'VirtualNetwork' ]
access: 'Allow'
priority: 210
direction: 'Inbound'
description: 'Allow Databricks TCP port 6666 inbound traffic between virtual networks'
}
// one or more ASGs and a single port
{
name: 'outbound-rule-deny-1'
access: 'Deny'
description: 'Deny outbound access on TCP 8080'
destination: [
'/subscriptions/11111111-1111-1111-1111-111111111111/resourceGroups/rgname/providers/Microsoft.Network/networkSecurityGroups/asg-01'
'/subscriptions/11111111-1111-1111-1111-111111111111/resourceGroups/rgname/providers/Microsoft.Network/networkSecurityGroups/asg-02'
]
destinationPort: [ '8080' ]
direction: 'Outbound'
priority: 210
protocol: '*'
source: [
'/subscriptions/11111111-1111-1111-1111-111111111111/resourceGroups/rgname/providers/Microsoft.Network/networkSecurityGroups/asg-03'
]
sourcePort: [ '*' ]
}
As you can see, I have consolidated several parameters:
sourceAddressPrefix
+ sourceAddressPrefixes
+ sourceApplicationSecurityGroups
destinationAddressPrefix
+ destinationAddressPrefixes
+ destinationApplicationSecurityGroups
sourcePortRange
+ sourcePortRanges
destinationPortRange
+ destinationPortRanges
All of these consolidated parameters are arrays, so you can specify one or more values for each parameter. THe module will then determine the correct parameter to use based on the input.
The module can be found in my GitHub repo HERE.
I hope you find this module useful.If you have any feedback or suggestions, please feel free to leave a comment below or reach out to me on Twitter (@MrTaoYang).
]]>Few weeks ago, I had a requirement to restrict Private Endpoints of certain Azure resources must be created with manual approval. This is because Private Endpoints for certain resources must only be created under very specific circumstances. For example, the Browser Authentication
Private Endpoint for Azure Databricks can only be created once per region per Private DNS zone. I could not find any existing policy definitions for enforcing private endpoints with manual approvals. Also the documentation I mentioned above only works for Private Endpoints created with automatic approvals.
So I created 2 policy definitions to cover my requirements.
The definition of this policy can be found in my Azure Policy Github repo - pol-deny-auto-approved-pe.json
The logic is pretty simple. When creating a Private Endpoint, if it is intended to be automatically approved, the privateLinkServiceConnections
property is used. Otherwise, when manual approval is required, the manualPrivateLinkServiceConnections
property will be used. So this policy is using the privateLinkServiceConnections
property to determine if the Private Endpoint is automatically approved or not. If the resource type and the PE sub-resource (aka Group Id
) matches what’s passed in from the parameters and the privateLinkServiceConnections
property is not empty, the policy will apply the specified effect to the request (either Deny
or Audit
).
I had to slightly modify the sample policy definitions from above mentioned documentation to look for both the privateLinkServiceConnections
and manualPrivateLinkServiceConnections
properties.
Using Azure Databricks as example, Databricks has 2 Private Endpoint sub-resources (groupId): databricks_ui_api
and browser_authentication
. This policy can be used for both (the groupId
is parameterised). This policy can be found my Azure Policy Github repo - pol-deploy-adb-private-dns-zones.json.
You can easily update it to cater for other resources, or even make a generic policy definition by parameterising the privateLinkServiceId
and groupId
properties.
]]>NOTE: This policy creates a
Microsoft.Network/privateEndpoints/privateDnsZoneGroups
child resource for the Private Endpoint, which essentially represents the Private DNS zone registration. When a Manually approved PE is created, although the policy will create theprivateDnsZoneGroups
resource as soon as the PE is created, the Private DNS zone registration will not be completed until the PE is approved. In another word, the DNS records for the PE will NOT be created until the PE is approved. This is by design.
This is the 3rd time I’m talking about the topic of monitoring Azure Policy compliance states using Azure Monitor. Previously in 2021, I have created a custom solution using an Azure Function app to ingest policy compliance data into Log Analytics. You can find the blog post here Monitoring Azure Policy Compliance States - 2021 Edition.
Over the last few years, I have spoken to the Azure governance product group numerous times on the topic of allowing people to query Azure Resource Graph (ARG) within Azure Monitor. Monitoring policy compliance state is a perfect use case for this capability.
Few days ago I came across this post from the Azure Observability Blog : Query Azure Resource Graph from Azure Monitor. I got very excited because I have been waiting for this for years.
Today, I have spent few hours and created a native monitoring solution for Azure Policy compliance states leveraging this new capability using Azure Monitor and Azure Resource Graph. This solution is nothing more than a standard log query alert rule. It is a lot simpler than the solution I created 2 years ago using Azure EventGrid and Azure Function app.
I have codified the solution into an Azure Bicep template and published it to my GitHub repo here: BlogPosts/Azure-Bicep /policy.monitor
Before deploying the solution, here’s a list of pre-requisites:
Add-AzRoleAssignment -ObjectId <aad-object-id> -scope / -RoleDefinitionName Owner
.*The Bicep template creates the following resources:
Essentially, this is the Kusto query used in the alert rule:
arg("").PolicyResources
| where type =~ 'Microsoft.PolicyInsights/PolicyStates'
| extend
complianceState = tostring(properties.complianceState),
resourceId = tostring(properties.resourceId),
resourceType = tolower(tostring(properties.resourceType)),
resourceLocation = tostring(properties.resourceLocation),
policyAssignmentName = tostring(properties.policyAssignmentName),
policyAssignmentId = tostring(properties.policyAssignmentId),
policyDefinitionId = tostring(properties.policyDefinitionId),
policyDefinitionAction = tostring(properties.policyDefinitionAction),
policyDefinitionGroupNames = tostring(properties.policyDefinitionGroupNames),
policyDefinitionReferenceId = tostring(properties.policyDefinitionReferenceId),
policySetDefinitionId = tostring(properties.policySetDefinitioNId),
policySetDefinitionCategory = tostring(properties.policySetDefinitioNCategory),
dtTimeStamp = todatetime(tostring(properties.timestamp))
| where complianceState =~ 'noncompliant'
| where dtTimeStamp >= now(-{0}m)
| project complianceState, id, name, policyAssignmentName, resourceId, resourceType, policyAssignmentId, policyDefinitionId, policySetDefinitionId, policySetDefinitionCategory, policyDefinitionAction, policyDefinitionGroupNames, resourceGroup, resourceLocation,subscriptionId, tenantId, apiVersion, timeStamp=tostring(properties.timestamp)
Note: the number in the line
where dtTimeStamp >= now(-{0}m)
is replaced by Bicepformat()
function depending on the alert frequency parameter value.
After the deployment, if there are non-compliant resources in the tenant, you will see alerts been triggered in Azure Monitor like this:
In the alert details, you will see the non-compliant resource Id, offending policy resource Id and policy assignment resource Id. You should be able to easily find the resource in the Policy Compliance blade in Azure Portal.
Lastly, you can find the official documentation here Query data in Azure Data Explorer and Azure Resource Graph from Azure Monitor.
]]>Being an DevOps consultant for Azure, most of the large enterprise customers I have worked with are using Azure DevOps (either the cloud version or the on-premises ADO servers).
For every project that I’m part of, the Self-Hosted agents have always been a pre-requisites that we request customers to provision before the start of our engagements. The project team would provide customers the requirements for the agents, such as Operating System type and version, list of required software, list of URLs need to be whitelisted on their Firewalls, etc.. Then in the ideal world the customers would provision the agents for us and we can start working from day 1.
However not even once I have seen these agents being ready for us to consume when we start the project. Last year when I was working on a project, the customer was only able to provide us with the agents in Sprint 8.
When the customers provisioned the agents, it is also very rare that all our requirements are met. It is difficult for us to validate because we would never have the access to logon to these agent computers.
At the beginning of every project, it is such a painful experience to get customers to correctly setup ADO agents in a timely manner. Although I cannot help with the provisioning process since every customer’s environment is different, but I have spent some time over the last few days to put together a little utility that can be used to validate the self-hosted agents according to our project requirements. I should be able to take this to every project as long as Azure DevOps is the tool of their choice.
This utility is an Azure DevOps Pipeline that can be used to validate the self-hosted Linux agents. It uses bash shell scripts to firstly query Azure DevOps REST API to get a list of agents, then it executes the validation shell script on every single agent in the agent pool.
You can find the code in my GitHub repo ado-agent-validation
As shown below, I have 2 agent pools in my lab ADO organisation, both have few Ubuntu VMs provisioned as agents. I have configured 2 agent instances per VM. In total, I have 2 VMs running total of 4 agents in the “dev” agent pool, and 1 VM running 2 agents in the “prod” agent pool.
The agent validation jobs are executed in parallel within each stage. It ensures all agents must be validated before completing the stage. If an agent is offline for some reason, the pipeline will wait for the agent to come back online and run the tasks.
In the agent validation script used by the pipeline (linux-agent-check.sh), I have included the following checks:
python3
and pip3
Azure CLI
bicep
, k8s-configuration
, k8sconfiguration
, connectedk8s
, k8s-extension
podman
kubectl
and kubelogin
Bicep
(Standalone) versionPowerShell Core
az
, az.resourceGraph
, Microsoft.Graph
, Pester
, PSRule
, PSRule.Rules.Azure
, powershell-yaml
jq
https://kubereboot.github.io/charts/
https://kedacore.github.io/charts/
https://api.github.com/
https://objects.githubusercontent.com/
https://dseasb33srnrn.cloudfront.net/
https://production.cloudflare.docker.com/
You must allow the pipeline to read the agent pool information from your Azure DevOps organisation (or project collection if you are using ADO servers). You need to complete the following steps:
Limit job authorization scope to current project for non-release pipelines
is turned off:Project Collection Build Service (your organisation name)
account the Reader
role. This is done in the Organization Settings –> Agent pools –> Select the pool–> Under the Security tab of the agent pool, grant the reader role to the account.When you are preparing the pipeline code in a git repository, you need to make sure all agent pool names are defined in the variable yaml template template-agent-validation-variables.yml
Secondly, configure the pipeline YAML file azure-pipelines-linux-ado-agent-validation.yaml to have a stage for each agent pool you want to validate. The poolName
value is from the variable defined in the previous step. For example, in my sample code, I have 2 agent pools (dev and prod), so I have 2 stages in the pipeline YAML file:
Lastly, update the agent validation script linux-agent-check.sh according to your requirements. You can add or remove checks as you wish. I have tested this script on both Ubuntu and RHEL agents.
When you are ready, create a new pipeline from the existing YAML file pipelines/azure-pipelines-linux-ado-agent-validation.yaml and you can start validating your agents!
If a computer is hosting multiple agents, the validation script will run multiple times on this computer because it runs on every agent. I haven’t found a way to solve this problem and let the pipeline to only run once per agent computer. This is because the List Agent REST API for Azure DevOps does not return the agent computer name. Therefore I cannot configure the pipeline stage matrix to loop based on computer names.
This pipeline ONLY works for Linux agents. I have no requirements for Windows agents hence I’ve never bothered to create a windows version of this pipeline.
During the URL tests, the script determines the result based on the HTTP response status code. Any code in 2xx and 4xx ranges are considered passed (although 4xx codes indicate client errors.) Some of the URLs I’m testing will return 403 (Forbidden), 404 (Not Found), 405 (Method Not allowed) codes, but I still consider them as passed. This is because These URLs we have requested customers to whitelist would be for a site, not specific pages. If the site is accessible, I consider the test passed. A different message in yellow colour will be displayed for any URLs that return 4xx codes.
It’s been 6 years since last Experts Live Australia. COVID has changed how we work, live and socialising with each other. I’m glad to see that Experts Live Australia is coming back this year. Unlike previous events, this year, Microsoft Australia has kindly taken the initiative and is organising the event. I am very honoured to be part of the organising committee together with Microsoft’s Sarah Young (@_sarahyo), Alessandro Cardoso (@cloudtidings), Orin Thomas (@orinthomas) and Steven Hosking (@OnPremCloudGuy) . Instead of Melbourne, this year, the event is going to be held at Microsoft Sydney Office on 19th-20th September 2023.
The sessions have been shortlisted, we have started announcing the sessions and speakers this week. The full agenda will be announced soon. We have selected many great sessions from Microsoft employees and MVPs, covering wide range of topics. If you are interested in attending the event in person, please head to the Experts Live Australia website for more details.
For me, I will be presenting 2 sessions:
In part 1 we have given an introduction for CARML, what does it offer. In Part 2, we have dived deeper and demonstrated how we can use CARML modules to deploy Azure resources or further develop more refined modules based on your organization’s needs.
You can find the videos here:
]]>I use the guid()
function a lot when working on Bicep code, however, few weeks ago I needed to generate unique GUIDs within a PowerShell script. I couldn’t find any existing code examples, so I came up with my own:
Function GenerateGuid {
[CmdletBinding()]
param (
[parameter(Mandatory = $true)]
[string[]]$inputStrings
)
$enc = [system.Text.Encoding]::UTF8
$sha = New-Object System.Security.Cryptography.SHA1CryptoServiceProvider
$joinedStrings = $inputStrings -join "-"
$joinedStringsByteArray = $enc.GetBytes($joinedStrings)
$joinedStringsHash = [system.Convert]::toBase64String($($sha.ComputeHash($joinedStringsByteArray)))
$joinedStringsHashTruncated = $joinedStringsHash.Substring(0, 16)
$joinedStringsHashTruncatedByteArray = $enc.GetBytes($joinedStringsHashTruncated)
$guid = [guid]::new($joinedStringsHashTruncatedByteArray)
$guid.tostring()
}
Same as the Bicep guid()
function, as long as the array of strings (and the positions) stay the same, you will get the same GUID every time you run the function:
It’s been so long since we had the last Experts Live event in Australia. The last Experts Live event I have attended was in March 2019 in Austin, USA. My good friend Daniel Mar was in the process of organising Experts Live Asia and Experts Live Australia for 2020, but unfortunately, due to COVID-19 pandemic, both events were cancelled.
I am very excited to announce that Experts Live Australia is back in 2023! The event will be held in Microsoft Sydney Office on 19th-20th 2023. This time, we are getting much needed support from Microsoft, and actually, most of the members in the organising committee are Microsoft employees. I am very honored to be part of the team. This is going to be the first in-person tech conference for me since the pandemic. I am really looking forward to it!
The call for speakers is now open, and so is the ticket sale.
If you are interested in attending the event, or submitting a talk, please head to the Experts Live Australia website for more details.
Hope to see you there! it’s going to be fun!
]]>