
Programmatically Generate Cloud Resource Names - Part 1
Many organizations have naming standard for cloud resources just like server naming conventions for on-premises data centers.
Few years ago during a cloud migration project, the particular customer had a terraform module for generating resource names for Azure. It uses Terraform’s local-exec provisioner to run a Shell Script to generate resource name and outputs the names as module output. When creating resources in Terraform, you would simply call the naming module and use the output of that module as the input for other resource modules. We really liked this approach.
Fast forward to 2022, when I started another project earlier this year with my good friend @AlexVerkinderen, we wanted to use the same approach, but with Azure DevOps and Bicep. We tossed some ideas around. Initially, to mimic what we have seen with Terraform few years ago, my initial thoughts were creating a Bicep module that leverages the Azure Deployment Scripts. But then I thought that would be too complicated, hard to maintain after we are gone, and the execution time will be too slow because you are essentially sending a script to be executed in a container hosted on Azure instead of running it locally (like how the previous customer did with Terraform using TF local-exec provisioner and Shell script). We then decided to use PowerShell to generate resource names and we are able to run it locally as part of our IaC pipelines. We have also taken consideration that the solution must be versioned, source controlled, and easily managed by a team that does not have strong knowledge with PowerShell. In the end I have developed a PowerShell Naming module that all the configurations and rules are stored in a configuration JSON file.
After that particular engagement, I thought this piece of work could benefit other people too, and it’s generic, without any customer-specific rules and information in it. Few people who knew about this module actually asked me if I had plans to make a public version. That triggered me to develop a newer and enhanced version, to extend the support to not only Azure, but also any clouds (i.e. AWS and GCP), and made it easier to integrate with your pipelines from a public PowerShell module repository such as PowerShellGallery.com by decoupling your business requirements (the naming pattern) and the actual code module.
now, 7 months have past since I developed the initial version for the customer, I finally managed to find some time to re-write this module, prepare the documentation and sample pipelines.
I am happy to announce that I have published the first version of the module and published it to PowerShell Gallery and GitHub.
This is part 1 of the 2-part series. In this part, I will show you how to use the module to generate resource names. In part 2, I will show you how to integrate it with your pipelines.
CloudNaming PowerShell Module
I have named this module CloudNaming, it is available in PowerShell Gallery and GitHub:
The CloudNaming module contains three functions that can be used in generating Cloud resource names for your organization. The documentation for these three functions are listed below:
- GetCloudNamingSuportedTypes: Get supported cloud resource types from the CloudNaming module
- GetCloudResourceName: Generate cloud resource names based on predefined naming standard.
- NewCloudNamingConfigFile: Create a new custom configuration file for the CloudNaming module to use.
This module leverages to following inputs that are very common in most organizations:
- cloud: Cloud provider names, i.e. Azure, AWS, or GCP
- company: Company or Business Unit name
- type: Resource types, i.e. vm (for Virtual Machine), vnet (for virtual network), etc.
- environment: Environment name, i.e.
dev,test,prod,d01,p02, etc. - location: Your company’s predefined location or region abbreviation of the cloud provider, i.e eus, aue, weuro etc.
- appIdentifier: The application identifier, i.e.
bizapp,sap, etc. - associatedResourceType: Associated resource type. Can be used to generate resource names that are associated to another resource type, i.e. private endpoints and public IPs.
- associatedResourceName: Associated resource name. Can be used to generate resource names that are associated to another resource, i.e. managed disks (th are associated to a virtual machine).
- workloadType: Used to define the role of the resource within the application. i.e.
db,web, etc. - startInstanceNumber: Used to define the starting number of the resource instance. i.e.
1,2, etc. - instanceCount: Used to define the number of resource names to generate. i.e.
1,2, etc.
NOTE: the
cloudparameter is the only required parameter. The rest of the parameters are all optional. This is by design, so when you run theGetCloudResourceNamefunction each time, you can only generate names for ONE specific cloud. If you want to generate names for multiple clouds, you will need to run the function multiple times, each time with a different-cloudparameter.
Installation
You can install the module from PowerShell Gallery using the following command:
Install-Module -Name CloudNaming -Repository PSGallery -force
Customization
After installation, take a look at the cloudNaming.json file inside the module folder. This is where you can define your naming rules and configurations.
You can also create your own version of the cloudNaming.json configuration file and pass it to the module when you call it.
The instruction for creating / updating the cloudNaming.json file is available in the Project Wiki Page Create Custom Json Config File.
How to generate resource names
After you have installed the module and created your own cloudNaming.json file, you can use the GetCloudResourceName function to generate resource names.
NOTE: To make the module easier to pass values between steps in CICD pipelines, all the outputs are deserialized json strings. You can use the
ConvertFrom-Jsoncmdlet to convert the output to a PowerShell object.
Here are few examples
Example 1: Generate 1 name for an Azure storage Account using a custom config file
Firstly, let’s find out what parameters are required for generating a name for Azure Storage Accounts based on the definition in C:\temp\customCloudNaming.json configuration file:
GetCloudNamingSupportedTypes -searchString "^Storage Account$" -cloud 'azure' -configFilePath C:\temp\customCloudNaming.json | ConvertFrom-Json
Output:
value        : sa
description  : Storage Account
cloud        : azure
minLength    : 3
maxLength    : 24
case         : lower
leadingZeros : True
pattern      : {resourceType}{company}{environment}{location}{appIdentifier}{instance}
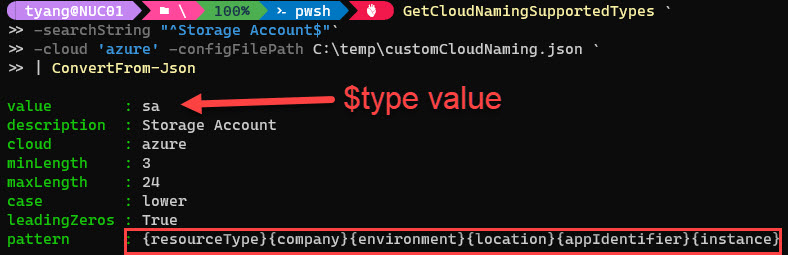
As shown in the screenshot above, to generate names for Azure Storage Accounts, the -type value (resource type abbreviate) is sa, and it requires you to pass in the following values:
- company
- environment
- appIdentifier
- location
The instance parameter is optional, and if not provided, the default starting sequence number will be 1.
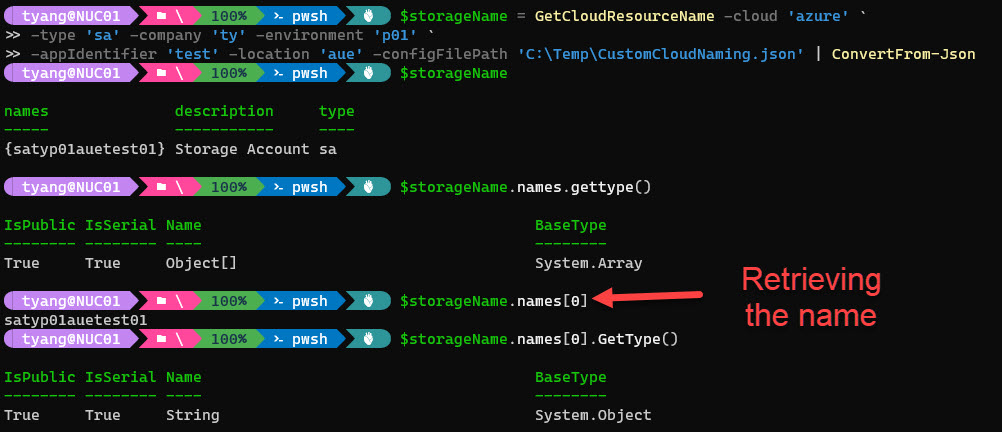
To generate the name, you can use the following command:
GetCloudResourceName -cloud 'azure' -type 'sa' -company 'ty' -environment 'p01' -appIdentifier 'test' -location 'aue' -configFilePath 'C:\Temp\CustomCloudNaming.json' | ConvertFrom-Json
output:
names              description     type
-----              -----------     ----
{satyp01auetest01} Storage Account sa
Example 2: Generate 2 names for multiple resource types using a custom config file
To simplify the process, you can generate multiple names for multiple resources in one command. The following command will generate 2 names each for AWS S3 buckets and EC2 instances based on the custom config file.
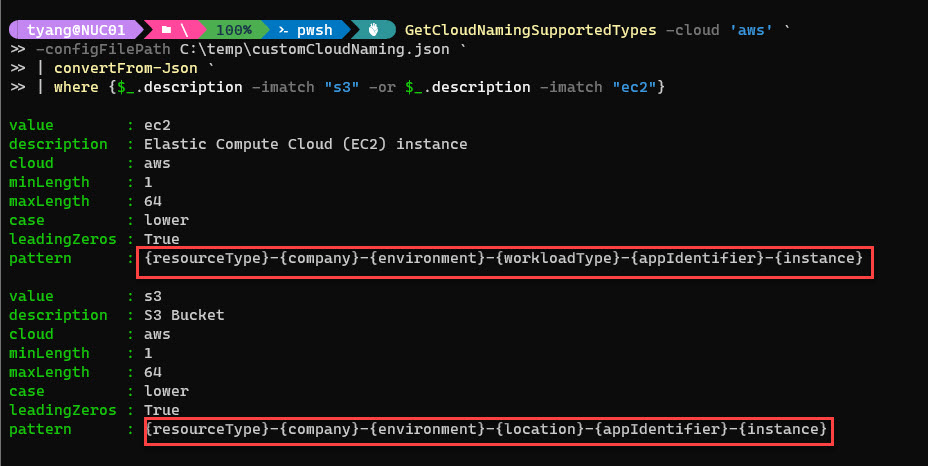
Firstly, let’s find out what parameters are required:
#Get all defined resource types for AWS in the custom configuration file and then filter the output to only show S3 buckets and EC2 instances
GetCloudNamingSupportedTypes -cloud 'aws' -configFilePath C:\temp\customCloudNaming.json | ConvertFrom-Json | where {$_.description -imatch "s3" -or $_.description -imatch "ec2"}
output:
value        : ec2
description  : Elastic Compute Cloud (EC2) instance
cloud        : aws
minLength    : 1
maxLength    : 64
case         : lower
leadingZeros : True
pattern      : {resourceType}-{company}-{environment}-{workloadType}-{appIdentifier}-{instance}

value        : s3
description  : S3 Bucket
cloud        : aws
minLength    : 1
maxLength    : 64
case         : lower
leadingZeros : True
pattern      : {resourceType}-{company}-{environment}-{location}-{appIdentifier}-{instance}
To generate names for multiple resource types, simply aggregate all required parameters. in this case, both S3 buckets and EC2 instances require the following common parameters:
- company
- environment
- appIdentifier
- instance
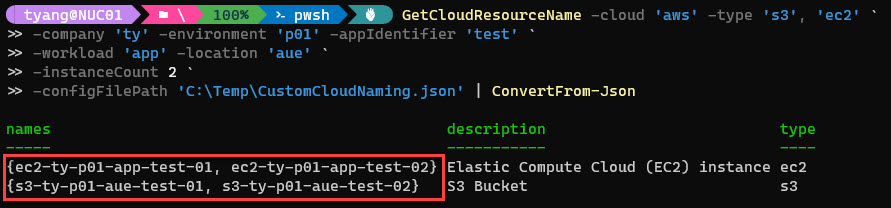
In addition to the above listed parameters, EC2 also requires the workloadType parameter and S3 requires the `location parameter. To generate 2 names for S3 buckets and EC2 instances, you can provide all required parameters by using the following command:
GetCloudResourceName -cloud 'aws' -type 's3', 'ec2' `
-company 'ty' -environment 'p01' -appIdentifier 'test' `
-workload 'app' -location 'aue' `
-instanceCount 2 `
-configFilePath 'C:\Temp\CustomCloudNaming.json' | ConvertFrom-Json
output:
names                                            description                          type
-----                                            -----------                          ----
{ec2-ty-p01-app-test-01, ec2-ty-p01-app-test-02} Elastic Compute Cloud (EC2) instance ec2
{s3-ty-p01-aue-test-01, s3-ty-p01-aue-test-02}   S3 Bucket                            s3
the output is an array, each item represents a resource type. To access the names for each resource type:
#stores output in a variable
$names = GetCloudResourceName -cloud 'aws' -type 's3', 'ec2' `
-company 'ty' -environment 'p01' -appIdentifier 'test' `
-workload 'app' -location 'aue' `
-instanceCount 2 `
-configFilePath 'C:\Temp\CustomCloudNaming.json' | ConvertFrom-Json

#access the names for S3 buckets
$s3Names = $names | where {$_.type -eq 's3'} | select -ExpandProperty names
Write-Output "S3 names"
$s3Names

#access the names for EC2 instances
$ec2Names = $names | where {$_.type -eq 'ec2'} | select -ExpandProperty names
Write-Output "EC2 names"
$ec2Names
Conclusion
In this article, I have shown how the module works and how to use it to generate resource names. I hope you find it useful.
NOTE: Since I spent 99.999% of my time working on Azure, the built-in configuration file already has a lot of name patterns defined for Azure resources. I have only included several patterns for AWS and GCP for demonstration purposes. If your intention to use this module for AWS and GCP, you can easily add more patterns to the configuration file. I also welcome Pull Requests to the GitHub repository if you want to extend the coverage for these cloud providers.
To learn how to use the module in Azure DevOps YAML pipelines, continue to the Part 2 of this series.
Leave a comment