Git Tag Validation Using Azure DevOps Pipeline Decorator
Introduction
In a customer’s environment, we have made a decision to use Git tags in Azure DevOps IaC pipelines to deploy Azure resources into the production environments. Git tags provide flexibility that allows us to lock down the version of the resources deployed into the production environment while developers can still work on new features and fixes that are not yet ready for production. It also gives us the ability to rollback to the previous version and testing the in-place upgrade of the resources by deploying the previous and current tags in a non-production environment prior to the production deployment.
To provide control to this design decision, the Azure DevOps Service Connections for production deployments are configured to only allow git tags in the Branch control settings. This means that the only way to deploy Azure resources into the production environment is to create a git tag.
There is a potential security risk if a tag is not created from the default branch main. When this happens intentionally or by mistake, Unauthorised/untested code can be deployed into production. To mitigate this risk, we need to validate the git tag and ensure the tag is created from the default branch main before it is deployed into the production environment.
We have identified the following requirements for the validation process:
To adhere to the zero trust security principle, the validation must be configured outside of the pipeline code so developers cannot bypass the validation.
For segregation of duties, this validation process must be managed by a separate group of people and have a proper code review process in place.
The validation must take place after every git checkout task in the pipeline so that developers cannot use the checkout task to bring down unauthorised code from other branches or repositories.
To fulfill the requirements, I have leveraged a feature in Azure DevOps called Pipeline Decorator and created a decorator to perform such validation.
Git Tag Validation Pipeline Decorator
Overview
An Azure Pipeline Decorator is a custom extension that adds steps to the beginning or end of every pipeline job in an Azure DevOps organization. The Pipeline Decorator allows us to inject additional tasks into the pipeline without modifying the pipeline code. This is a perfect solution for our requirements.
You can learn more about Pipeline Decorator from the official documentation and Pipeline decorator expression context.
The code for the decorator can be found at my GitHub Repo ado-pipeline-decorator.
The Git Tag Validation pipeline decorator needs to be published to Microsoft Visual Studio marketplace as a private extension and explicitly shared with the Azure DevOps organizations of your choice.
I have added conditional logic to the pipeline decorator to only run for a small number of pipelines based on the ADO organisation name, project name, repository name and pipeline IDs specified in the condition. It will not do anything if it is shared and installed in other Azure DevOps organizations.
How it works
The Git Tag Validation pipeline decorator is configured to run immediately after each checkout task in the pipeline, with the following conditions:
${{ if and(eq(variables['System.CollectionUri'], 'https://dev.azure.com/contoso/'), eq(variables['System.TeamProject'], 'MyProject'), eq(resources.repositories['self'].name, 'my-repo'), or(eq(variables['System.DefinitionId'], '1'), eq(variables['System.DefinitionId'], '2'), eq(variables['System.DefinitionId'], '3')), startsWith(variables['Build.SourceBranch'], 'refs/tags/')) }}:
This configuration ensures the decorator task only gets executed when the pipeline meets the following conditions:
- The ADO organization URI must be
https://dev.azure.com/contoso/(eq(variables['System.CollectionUri'], 'https://dev.azure.com/contoso/')) - You will need to update this value to the URI of your ADO organization. - The ADO project name must be
MyProject(eq(variables['System.TeamProject'], 'MyProject')) - You will need to update this value to the ADO project within your organization. - The repository name must be
my-repo(eq(resources.repositories['self'].name, 'my-repo')) - You will need to update this value to the git repository name within your project. - The pipeline definition ID must be
1,2, or3(or(eq(variables['System.DefinitionId'], '1'), eq(variables['System.DefinitionId'], '2'), eq(variables['System.DefinitionId'], '3'))) - Update this to the IDs of the pipelines that you want the pipeline decorator to target. - The pipeline must be triggered by a git tag (
startsWith(variables['Build.SourceBranch'], 'refs/tags/')))
The decorator injects a task called Git Tag Validation (Injected) after each checkout task in the pipeline. The task executes a PowerShell script defined as an inline script in the decorator’s yml file.
The script performs the following steps:
-
get the default branch name from the pipeline variable
resources.repositories['self'].defaultBranch. Read more about this variable here. -
Get the latest commit Id of the current checked out tag using command
git rev-list -n 1 $tagName -
Fetch the latest x number of commits from the default branch using command
git fetch --depth $maxGitFetchDept origin $defaultBranchNamewhere the value of variable$maxGitFetchDeptcan be defined from the environment variable of the script here -
Check if the default branch’s commit history retrieved from step 3 contains the latest commit id of the tag that’s retrieved from step 2.
-
If the default branch’s commit history does not contain the tag’s commit Id, script will fail and the pipeline run will end with failure.
IMPORTANT: The validation is not focusing on the source branch of the tag but rather the commit history.
This logic ensures the following scenarios are also covered:
- When a tag is created from the default branch and then the default branch was reverted to a previous commit. In this case, the validation will fail.
- When a tag is created from a feature branch and then the feature branch was immediately merged into the default branch. In this case, the validation will pass since the tag’s commit history is now part of the default branch.
By specifying the maximum number of commits to fetch from the default branch, we can ensure only a relatively recent tag is used for deployment. This can prevent a very old tag from being deployed.
How to Extend Decorator to Other Pipelines
The condition mentioned in the previous How does it work section can be modified to include other pipelines in the your ADO organisation.
For additional pipelines in the MyProject project The condition can be modified to include other pipelines by adding the repository name and pipeline definition ID to the condition..
For additional pipelines in other projects in your ADO organization, It’s better to duplicate the combination of conditions for project name, repo name and pipeline IDs.
NOTE: As the condition gets more and more complex in the future, to simply the conditions, the repository name condition may be removed as the the combination of project name and pipeline definition IDs is unique across the organization.
Prerequisites
For the pipeline decorator to work, the following prerequisites must be met.
Checkout task configuration
At the beginning of each pipeline job, a checkout task is automatically added as the first task of the job (regardless of whether it is explicitly defined in the YAML code). This task is responsible for checking out the source code from the repository.
By default, the checkout task performs a Shallow fetch of the repository. This means that only the required commit is fetched, and not the entire repository history. This is done to optimize the pipeline run time and reduce the amount of data transferred over the network.
In order for the Git Tag Validation decorator to work, the checkout task must be configured not to use the shallow fetch method. This can be done by setting the fetchDepth parameter of the checkout task to 0. This will fetch the entire repository history, including all tags, branches, and commits.
To configure the checkout task to perform a Deep fetch, add the following snippet to the YAML file at the beginning of each job (under the steps section):
steps:
  - checkout: self
    fetchDepth: 0
If this configuration is not set, the pipeline will fail if it’s executed under a git tag and the tag is not created from the latest commit of the default Git branch.
When the fetchDepth is not configured, you will see the --depth=1 option in the git config command in the debug messages of the pipeline runs (as shown below).

Alternatively, when fetchDepth is set to 0, the --depth parameter is not set in the git fetch command. You can verify this in the debug messages of the checkout task (as shown below).

Branch Policy for the default branch
The following settings in the branch policy of the default branch of the repository that contains the pipeline must be configured:
- Require a minimum number of reviewers: This setting must be enabled so direct commit to the default branch is prohibited.
- Limit merge types: Only Squash merge should be allowed.
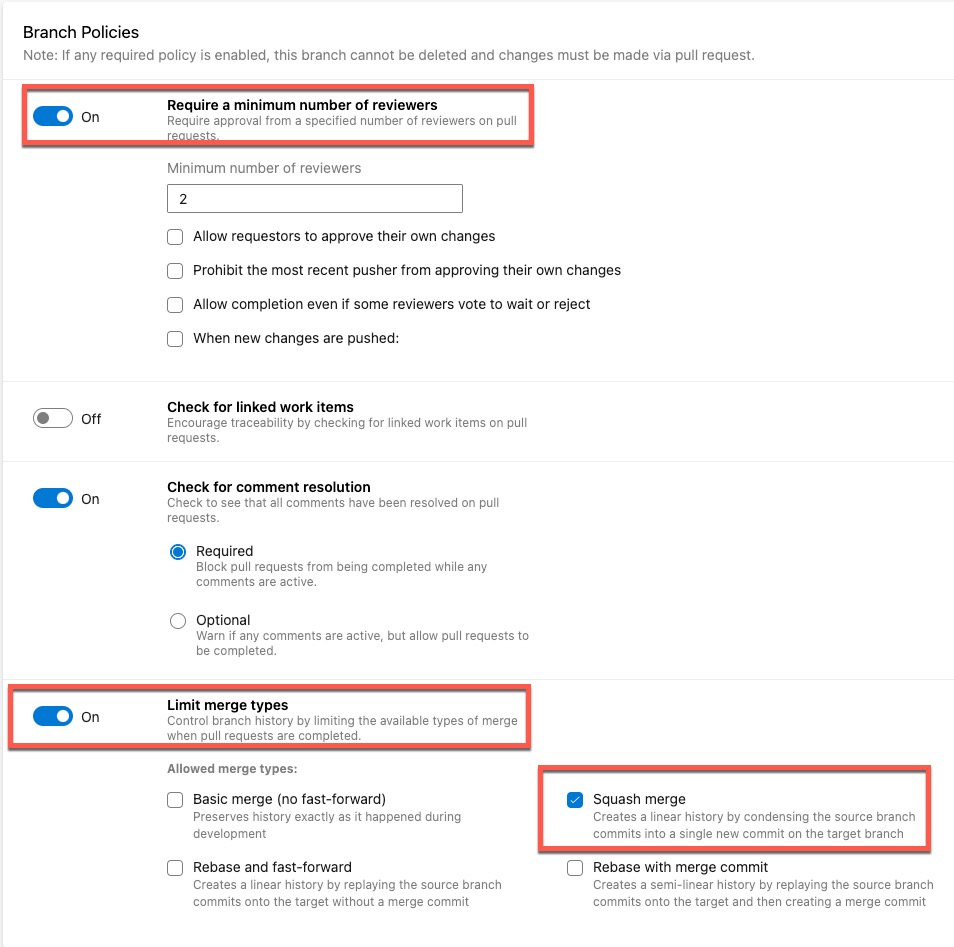
The reason for only allowing Squash merge is that the complete commit history of a feature branch is not retained in the default branch after it’s merged. This is crucial for the validation. Without this, malicious code can potentially exist in one of the commits in a feature branch but removed before merging into the default branch. If squash merge is not used, the commit that contains malicious code can be part of the default branch’s commit history and the validation will pass if a tag is created from that commit.
Decorator Installation
Marketplace Publisher
A Visual Studio marketplace publisher must be created first. This publisher is used to publish pipeline decorator as a private extension and then can be shared with your Azure DevOps organization. You can follow this instruction to create a publisher for your organization if required: Create a publisher.
Packaging and Publishing the Decorator Extension
Prior to packaging and publishing the decorator extension, NodeJS and NPM must be installed on the local computer.
For Ubuntu Linux (such as WSL):
#Install node.js
sudo apt install nodejs -y

#Install NPM
sudo apt install npm -y

#Install Cross-platform CLI for Azure DevOps
sudo npm i -g tfx-cli
For Windows (using WinGet):
#Install node.js
winget install -e OpenJS.NodeJS

#restart the terminal if required

#Install Cross-platform CLI for Azure DevOps
npm i -g tfx-cli
Note: If WinGet is not installed on the Windows machine, you can download the installer from here
The following steps are required to create a brand new extension. It only needs to be done once, which is NOT required for this pipeline decorator because it’s already created.
# initialize a new npm package manifest
npm init -y

#Install the Microsoft VSS Web Extension SDK package and save it to your npm package manifest
npm install azure-devops-extension-sdk --save
To create the packaged extension, make sure the publisher name is updated and the SemVer version number is increased appropriately in the vss-extension.json file, and then run the following command in the root directory of the extension:
#create extension
tfx extension create
After the extension is packaged, you can either manually publish it from the Visual Studio Marketplace page, or using the following command to publish it:
#publish or update extension and share with your ADO org

tfx extension publish --publisher [your-publisher] --auth-type 'pat' --token [your-pat-token] --username [your-username] --manifest ./[your-publisher].gittagvalidation-[version].vsix --share-with [your-ado-org]
The above command will publish / update the extension, and as well as sharing it with your ADO organization. you can also publish it without sharing by removing --share-with [your-ado-org] from the command. However, if it is not shared via the command line, it has to be manually shared from the marketplace page.
Note: to use the above command, you will need to create a Personal Access Token (PAT) in Azure DevOps for your account. If this is not done, follow this instruction to create the PAT token first: Create a personal access token
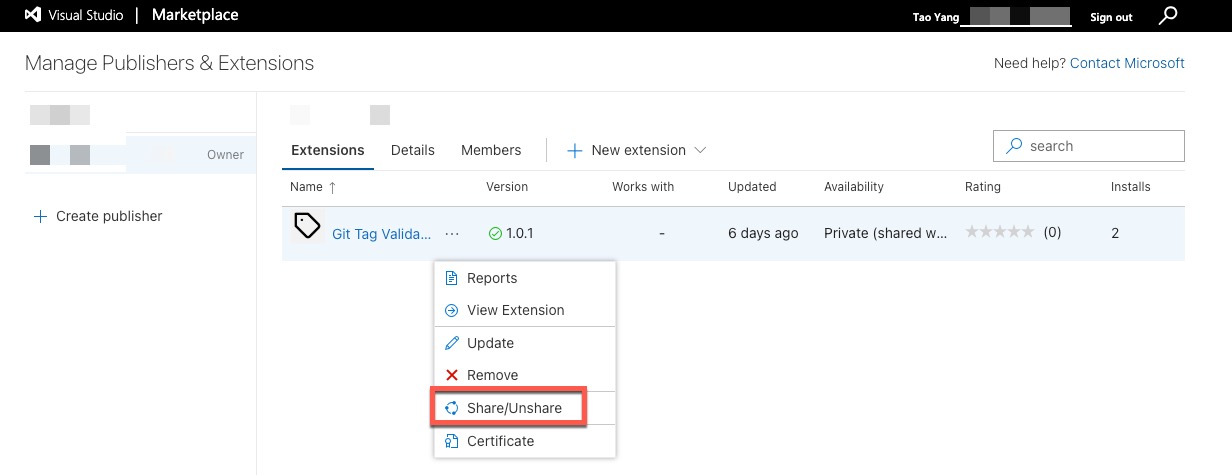
To share the extension manually, Click on the ... next to the extension, and select Share/Unshare
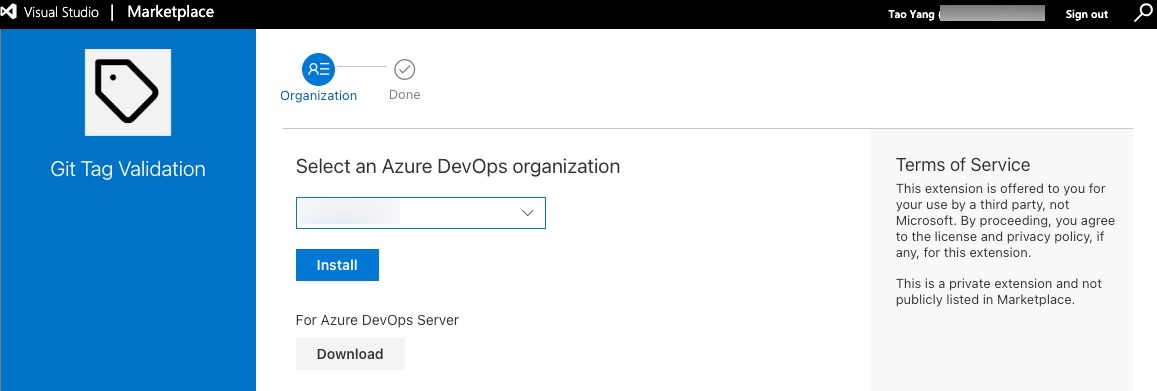
Then Select the ADO organization you want to share with and click Install.
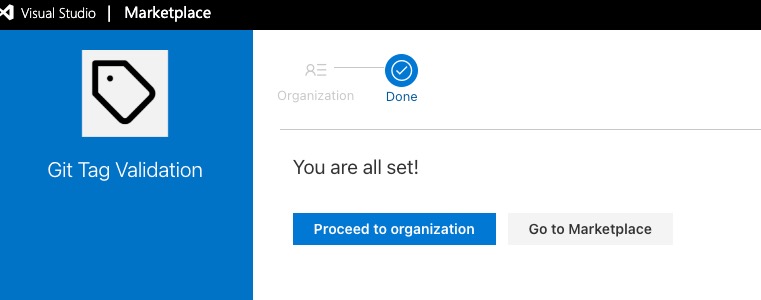
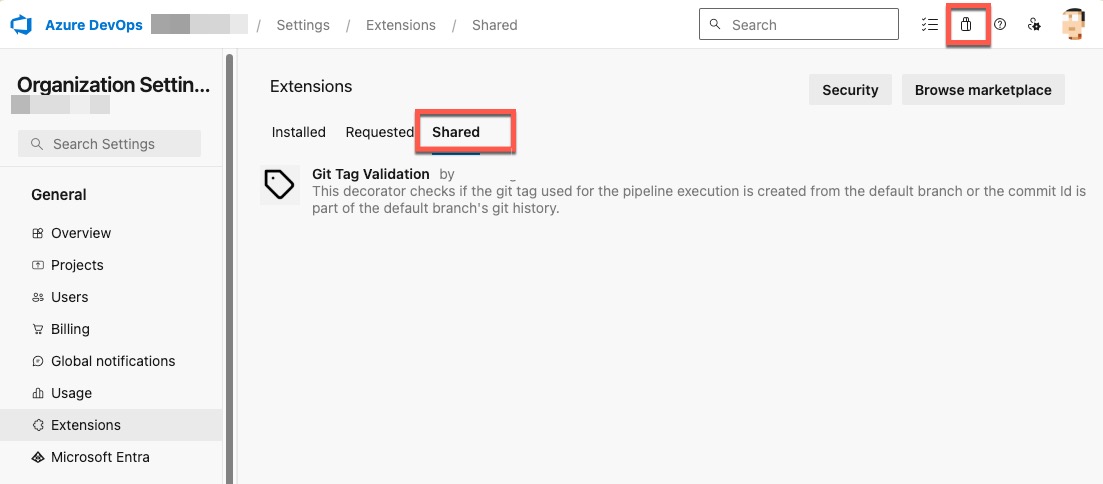
Once the extension is published and shared, the extension must be installed in the ADO organization by a Project Collection Administrator. You can browse to the marketplace within your Azure DevOps organization by clicking on the marketplace icon located on the top right corner of the page and select Manage extensions, then select the Shared tab under Extensions.
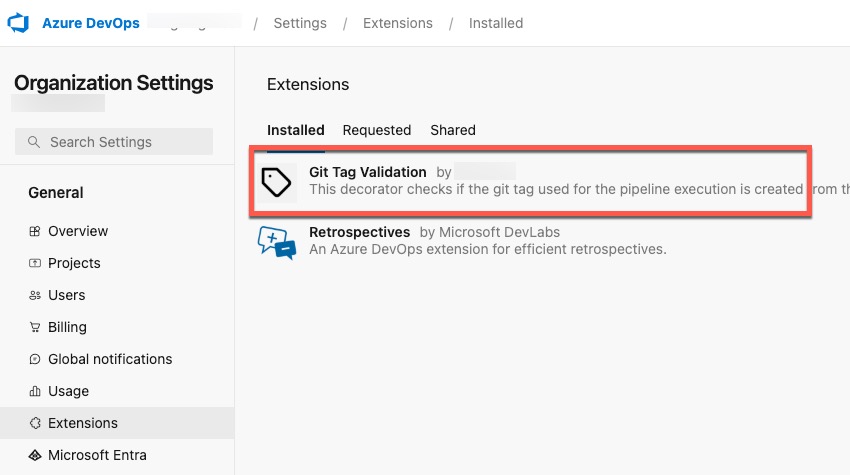
Once the extension is installed, it will appear under the Installed tab.
Once it is installed, the pipeline decorator will automatically inject the task to the appropriate pipelines when they are executed next time if all the conditions are met.
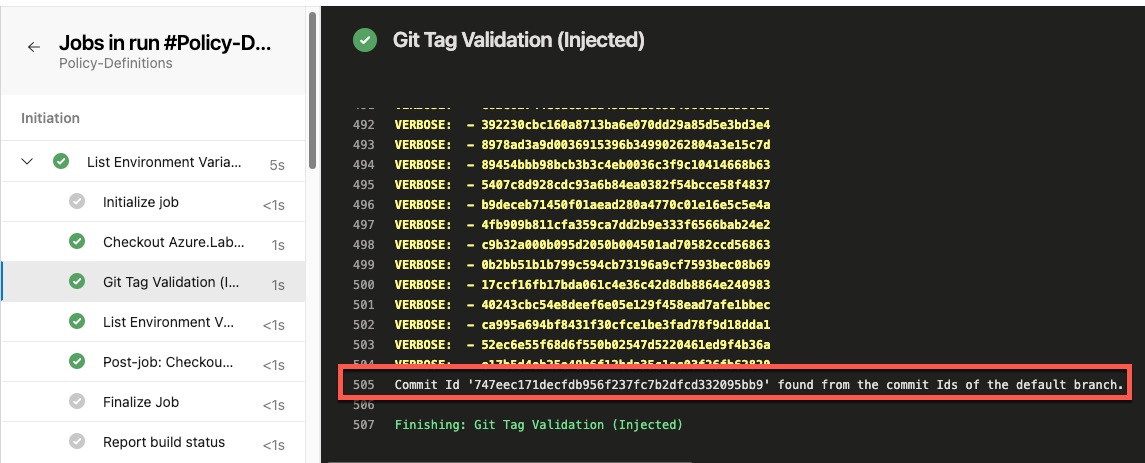
Each injected task should only take few seconds to execute and the pipeline will fail if the tag is not created from the default branch.
Successful validation looks like below:
If the git tag’s commit ID is not found in the default branch’s commit history, the pipeline will fail as shown below:

Troubleshooting
If the pipeline pipeline decorator did not inject the task as expected, you can expand and check the the job preparation parameter at the beginning of each pipeline job. The Git Tag Validation (Injected) task should be listed there and evaluation result should be true.
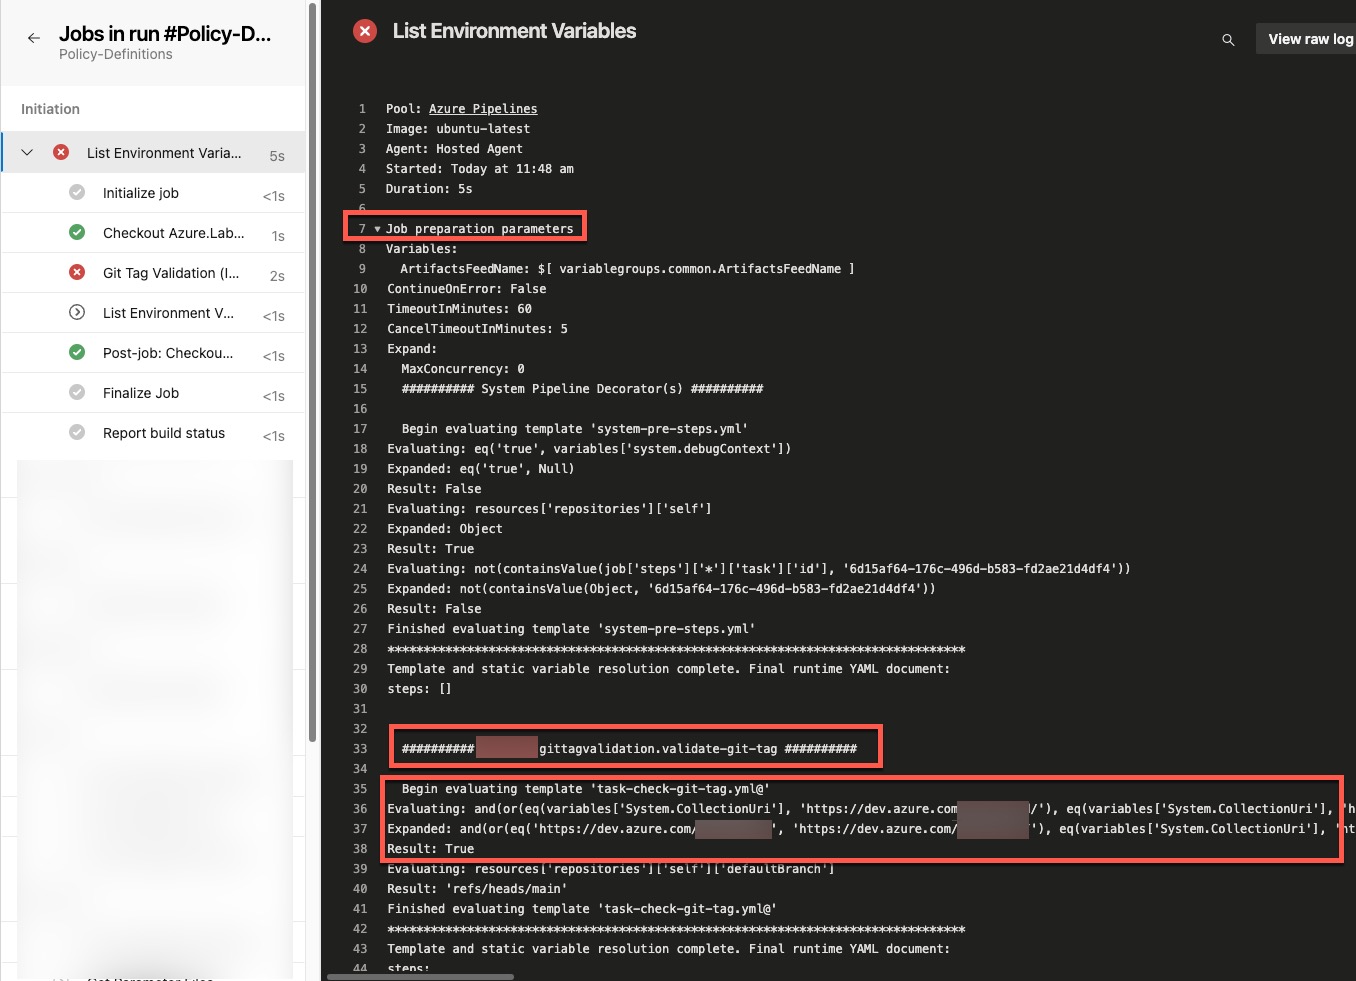
If the evaluation result is false, it means the conditions for the decorator to run are not met. You can check the conditions in the decorator’s yml file and the pipeline job’s parameters to identify the issue.
If the evaluation failed, it means there are bugs or syntax errors in the decorator’s YAML file.
Conclusion
I have known about the Pipeline Decorator feature for few years and always wanted to start using it. This is the first time that I found a good use case that can solve a real-world problem. I am very happy with the outcome and the solution. I hope you find this article useful and what I have developed can be helpful to you if you are facing the same problem or want to implement the same control to your Azure DevOps pipelines.
I found this YouTube video Azure Pipelines Decorators - ALL you NEED to know from @davidebenvegnu really helpful when I tried to learn about the Pipeline Decorator. I want give him credit for what he has done that helped me develop this solution.

Leave a comment