Background
This blog has been a little bit quiet over the last couple of weeks as I have been busy working on few projects that are yet to be finalised to be released to the public. Few days ago, there was a private conversation between few SCCDM MVPs – we were trying to figure out how to configure the IE settings on a management server in order to complete the OMS registration process using the console on the management server itself. As the result of that conversation, I raised question if OpsMgr can be installed on Windows Server Core because I believe any kind of administrative tasks should be performed from a remote machine. My buddy Stanislav Zhelyazkov pointed out it’s actually supported and suggested this could actually be a good blog topic. I am also very interested in seeing this to work in my lab, as I have been spent a lot of $$$ lately on computer hardware for my lab, I think it would benefit myself if I can cut the footprint of some applications that I have running in my lab by removing the GUI interfaces from Windows server instances.
So, I spent my spare time this weekend trying to install each of the OpsMgr 2016 TP3 component on Windows Server 2016 TP3 with one principal – each component must be installed on a Windows Server OS with minimum supported GUI interface. In this post, I will go through my deployment experience.
Overview
As we all know, currently (OpsMgr 2016 Tp3) is still largely the same as OpsMgr 2012 R2, with added support to newer OS (Windows Server 2016 TP) and few minor new functionalities.
Nowadays, Windows Server consists the following UI options (from minimum to maximum):
- Server Core (No GUI)
- Graphical Management Tools and Infrastructure aka. the Minimal Server Interface (Server-Gui-Mgmt-Infra)
- Server Graphical Shell (Server-Gui-Shell)
- Desktop Experience (looks and feels just like a desktop), it even has the Xbox app installed (if you ask me, why not just use Windows 10?)
Currently, OpsMgr consists of the following roles:
| Role | Required Components | Minimum OS GUI requirement |
|---|---|---|
| Management Server | .NET 4.5.2 / 4.6 | Graphical Management Tools and Infrastructure |
| Operational DB | SQL Database Engine (SQL2014) | Server Core |
| Data Warehouse DB | SQL Database Engine (SQL 2014) | Server Core |
| Web Console Server | .NET 3.5 Sp1 / 4.5.2 / 4.6 | Server Core |
| Gateway Server | .NET 4.5.2 / 4.6 | Server Core |
| Reporting Server | .NET 3.5 Sp1 / 4.5.2 / 4.6, SQL Server Reporting Services (SQL 2014) | Server Graphical Shell |
In the end, I managed to install all the OpsMgr components on server core or minimal server interface, except for the Reporting Server. This is because only limited SQL Server components are supported by Windows Server Core. SQL Server Reporting Services (SSRS) requires full GUI (Server Graphical Shell). Although OpsMgr 2016 Tp3 only supports up to SQL 2014, this requirement has not changed for SQL 2016 Technical Preview (https://msdn.microsoft.com/en-us/library/hh231669.aspx). Therefore, the OpsMgr Reporting Server is the only component I had to install on a server with full graphical interface.
In the past, when I deploy OpsMgr in my lab, I would use a single SQL instance to host both Operational DB, Data Warehouse DB, as well as SSRS and OpsMgr reporting server. Due to the GUI requirement I have mentioned above, I am unable to do so this time – I had to create a separate virtual machine just for OpsMgr Reporting Server and SSRS. However, I think having a dedicated reporting server could be a more realistic approach in many large production environments, especially when the Operational DB and Data Warehouse DB are hosted on SQL server clusters, and since SSRS is not cluster aware, it cannot be a part of the cluster resource.
As the result, I have deployed the following servers in my lab. All of them are running Windows Server 2016 TP3:
| Server Name | OpsMgr Role | OS GUI Level |
|---|---|---|
| OMTP3DB01 | Operational DB and Data Warehouse DB SQL Server | Server Core |
| OMTP3MS01 | First Management Server | Graphical Management Tools and Infrastructure (Minimal Server Interface) |
| OMTP3MS02 | Additional Management Server | Graphical Management Tools and Infrastructure (Minimal Server Interface) |
| OMTP3GW01 | Gateway Server | Server Core |
| OMTP3WEB01 | Web Console Server | Server Core |
| OMTP3RP01 | Reporting Server | Server Graphical Shell (Full GUI) |
I will now go through my experience of configuring each OpsMgr 2016 TP3 components in my lab (with minimum GUI).
01. General OS Installation
I did not use any image or template based deployment methods (i.e. via VMM or ConfigMgr). I simply manually created these VMs on a Windows Server 2012 R2 Hyper-V box and installed the OS using the Windows Server 2016 TP3 ISO that I’ve downloaded from my MSDN subscription. I chose Server Core during the install for all above mentioned virtual machines. After the OS install, I performed the following tasks on all servers:
Using sconfig.cmd to configure the following:
- Server name
- IP address and DNS settings
- Join Domain
Install .NET Framework 3.5 using dism.exe
Dism /online /enable-feature /featurename:NetFx3 /All /LimitAccess /Source:d:\sources\sxs
Note: D: is the CD-ROM drive in this case
Configure disks and volumes using diskpart.exe
I am not going to go through diskpart here, and it is not the only way to do so.
02. Configure SQL Server (OMTP3DB01)
I mounted the SQL 2014 Enterprise with SP1 ISO to the VM in Hyper-V and launch the install using command:
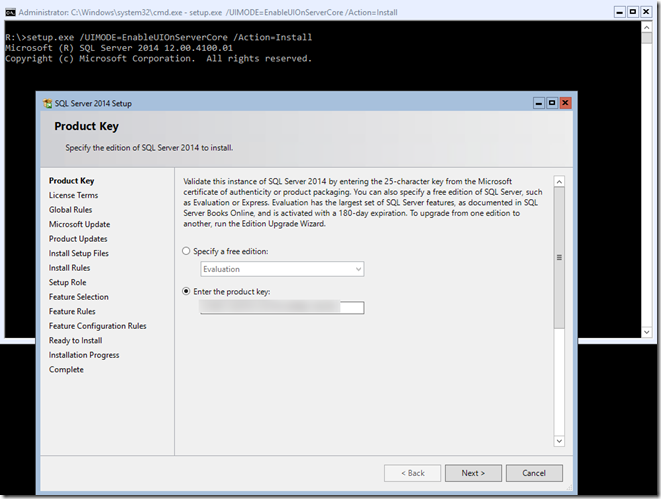
setup.exe /UIMODE=EnableUIOnServerCore /Action=Install
This command directly launch the setup wizard:
I then went through this wizard and installed SQL as I normally would, the only thing to keep in mind is that not all the SQL features are supported in Server Core, I have selected the following features:
- Database Engine Services
- Full-Text Search
- Client Tool Connectivity
- SQL Client Connectivity SDK
Note: if you have chosen a feature that’s not supported by Server Core, you will get this error message:
After few minutes, SQL server was successfully installed:
As you can see, since this is on a Server Core machine, I did not install SQL Management Studio on this server, I performed all other required SQL configuration such as minimum and maximum memory config, temp DB config, maintenance plan creation, etc. from a remote machine. I will go through the steps I took to setup a machine for remote management towards the end of this post.
Note: I found a good post on how to install SQL on Server Core: http://tenbulls.co.uk/2012/09/19/using-the-sql-server-installation-wizard-on-server-core/. However, when I initially launched the install wizard without “/Action=Install” switch, I was presented to the “SQL Server Installation Center” page, but when I clicked on any links on this page, nothing would happen. Luckily someone mentioned this switch in one of the comments and I was able to by pass this page:
03. Configure the First Management Server (OMTP3MS01):
As documented on TechNet, management servers require the minimal server interface and AuthManager:
So, before installing the OpsMgr management server component, I need to firstly install these 2 components.
Note: There’s a spelling mistake in the above highlighted section. The server feature is Server-Gui-Mgmt-Infra, it’s “f”, not “t”.
Install Server-Gui-Mgmt-Infra via PowerShell:
Install-WindowsFeature Server-Gui-Mgmt-Infra -Source wim:D:\sources\install.wim:2
Note:
- D: is the CD-ROM in this VM which has the Windows Server 2016 TP3 ISO loaded.
- You can refer to THIS post detailed steps of adding GUI to Server Core, including how to check the image index in the wim file.
Install AuthManager using Dism.exe
After installing the minimal server interface, I need to reboot the server. After the reboot, I used dism to add AuthManager :
dism /online /enable-feature /featurename:AuthManager /source:d:\sources\sxs
Install first management server
Note: When I downloaded the System Center 2016 TP3, each System Center component is presented as a EXE:
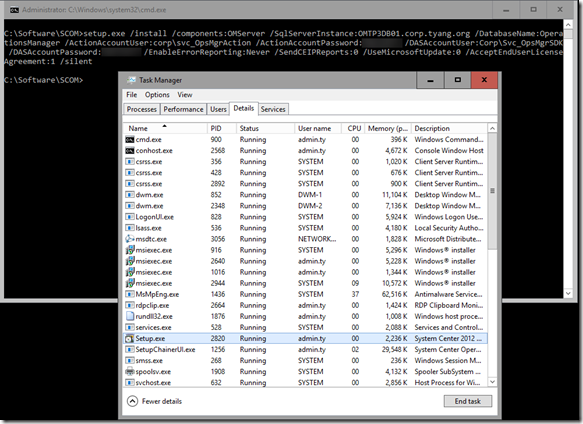
When I run the exe, I can specify a location to extract the installation to. I have previously extracted the OpsMgr installation to a folder, and copied the extracted content to C:\Software\SCOM on all the servers I mentioned above. So, now, I will run the unattended install from C:\Soffware\SCOM on this management server:
setup.exe /install /components:OMServer
/ManagementGroupName:TP3
/SqlServerInstance:OMTP3DB01.corp.tyang.org
/DatabaseName:OperationsManager
/DWSqlServerInstance:OMTP3DB01.corp.tyang.org
/DWDatabaseName:OperationsManagerDW
/ActionAccountUser:corp\svc_OpsMgrAction
/ActionAccountPassword:<password>
/DASAccountUser:Corp\Svc_OpsMgrSDK
/DASAccountPassword:<password>
/DatareaderUser:Corp\Svc_OpsMgrDataReader
/DatareaderPassword:<password>
/DataWriterUser:Corp\Svc_OpsMgrDW
/DataWriterPassword:<password>
/EnableErrorReporting:Never
/SendCEIPReports:0
/UseMicrosoftUpdate:0
/AcceptEndUserLicenseAgreement:1
/silent
Note:
- You can also refer to the official TechNet article for first management server unattended install here: https://technet.microsoft.com/en-us/library/hh301922.aspx, and my fellow SCCDM MVP Christopher Keyaert has also blogged about it before: http://scug.be/christopher/2014/03/10/scom-2012-r2-unattended-installation-command-line/
- Please update the command to suit your environment.
- The installation also logs to “%LocalAppData%\SCOM\Logs” folder. You may have to check the logs in this folder the installation didn’t go as what you have hoped.
- Since I did not install the Operations Console on the management server, I did not have to install the SQL CRL Type and Report Viewer as pre-requisites. – They are the pre-reqs for the console, not for the management server server.
04. Configure Additional Management Server (OMTP2MS02):
I have gone through the same OS requirements as the first management server (Server-Gui-Mgmt-Infra and AuthManager), please refer to the previous section. After these components were installed on OMTP3MS02, I used a slightly simpler command for the additional management server install:
setup.exe /install /components:OMServer
/SqlServerInstance:OMTP3DB01.corp.tyang.org
/DatabaseName:OperationsManager
/ActionAccountUser:corp\svc_OpsMgrAction
/ActionAccountPassword:<password>
/DASAccountUser:Corp\Svc_OpsMgrSDK
/DASAccountPassword:<password>
/EnableErrorReporting:Never
/SendCEIPReports:0
/UseMicrosoftUpdate:0
/AcceptEndUserLicenseAgreement:1
/silent
05. Configure Gateway Server (OMTP3GW01)
The OS requirement for gateway servers is different than management servers. It does not require the minimal server interface (Server-Gui-Mgmt-Infra) and AuthManager. Additionally, we cannot use the setup.exe for the gateway server unattended install. we must execute the gateway server msi directly using msiexec.exe.
As I mentioned before, the OpsMgr install bits have already been copied to each server, in the command prompt, I firstly changed the directory to C:\Software\SCOM\gateway\AMD64 (C:\Software\SCOM is where I copied the install bits to).
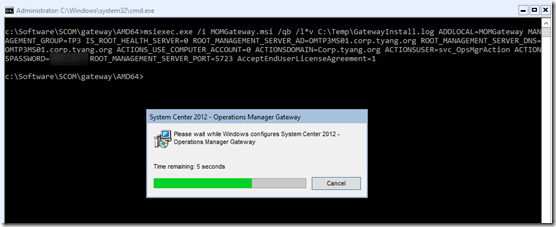
I then used msiexec with the following parameters:
msiexec.exe /i MOMGateway.msi /qb /l*v C:\Temp\GatewayInstall.log
ADDLOCAL=MOMGateway MANAGEMENT_GROUP=TP3
IS_ROOT_HEALTH_SERVER=0
ROOT_MANAGEMENT_SERVER_AD=OMTP3MS01.corp.tyang.org
ROOT_MANAGEMENT_SERVER_DNS=OMTP3MS01.corp.tyang.org
ACTIONS_USE_COMPUTER_ACCOUNT=0
ACTIONSDOMAIN=Corp.tyang.org
ACTIONSUSER=svc_OpsMgrAction
ACTIONSPASSWORD=<password>
ROOT_MANAGEMENT_SERVER_PORT=5723
AcceptEndUserLicenseAgreement=1
After the gateway server has been successfully installed, I must approve it from a management server by taking the following steps:
- Go to the SupportTools folder from the Installation files, copy Microsoft.EnterpriseManagement.GatewayApprovalTool.exe to the management server installation folder:
- copy Microsoft.EnterpriseManagement.GatewayApprovalTool.exe “c:\Program Files\Microsoft System Center 2012 R2\Operations Manager\Server”
- Go to the management server installation folder and execute:
Microsoft.EnterpriseManagement.GatewayApprovalTool.exe
/ManagementServerName=OMTP3MS01.corp.tyang.org
/GatewayName=OMTP3GW01.corp.tyang.org
/Action=Create
Lastly, I need to configure the gateway server to failover to another management server. Since I did not install the console on management servers, I must perform this task on a remote machine where the console is installed (as the Operations Manager PowerShell is part of the console install):
$GatewayServer = Get-SCOMGatewayManagementServer –Name "OMTP3GW01.corp.tyang.org"
$FailoverServer = Get-SCOMManagementServer –Name "OMTP3MS02.corp.tyang.org"
Set-SCOMParentManagementServer -GatewayServer $GatewayServer -FailoverServer $FailoverServer
Note:
- Since this is only a test and I do not have a real need for a gateway server for a untrusted boundary, I have configured this gateway server to join my AD domain. Therefore, I do not have to configure certificates for this gateway server.
- Official documentation for gateway server unattended installation can be found here: https://technet.microsoft.com/en-us/library/hh456445.aspx
- The official documentation has missed a required parameter “AcceptEndUserLicenseAgreement”. My friend and fellow SCCDM MVP Marnix Wolf has previously blogged about this error on his blog: http://thoughtsonopsmgr.blogspot.com.au/2014/06/installing-scom-2012x-gateway-server.html
06. Configure Web Console server (OMTP3WEB01)
The web console server can be installed on a Server Core instance. However, we must firstly install all required IIS and .NET components.
Install IIS components via PowerShell:
Add-WindowsFeature Web-Static-Content,Web-Default-Doc,Web-Dir-Browsing,Web-Http-Errors,Web-Http-Logging,Web-Request-Monitor,Web-Filtering,Web-Stat-Compression,Web-Metabase,Web-Asp-Net,Web-Windows-Auth,Web-ASP,Web-CGI
Install HTTP Activation (.NET component) via PowerShell:
Add-WindowsFeature NET-WCF-HTTP-Activation45
Install Web Console Pre-requisites (SQL CLR Type and Report viewer):
msiexec /i SQLSysClrTypes.msi /q
msiexec /i ReportViewer.msi /q
You may connect to the application event log from a remote machine and verify these 2 MSIs have been installed successfully.
Install Web Console:
Go to the folder where SCOM Install bits are located:
setup.exe /silent /install /components:OMWebConsole
/ManagementServer:OMTP3MS01.corp.tyang.org
/WebSiteName:"Default Web Site"
/WebConsoleAuthorizationMode:Mixed
/SendCEIPReports:0
/UseMicrosoftUpdate:0
/AcceptEndUserLicenseAgreement:1
Note:
- Official documentation for web console unattended install: https://technet.microsoft.com/en-us/library/hh298606.aspx
- Since the IIS management console is not installed on server core, I will go through how to install and configure IIS management in the remote management section towards the end of this post.
07. Configure Reporting Server
Since the Reporting server has the full GUI interface enabled (required by SSRS), there is no much to cover here. I will only briefly go through few points here.
Install SQL Server Reporting Services (SSRS)
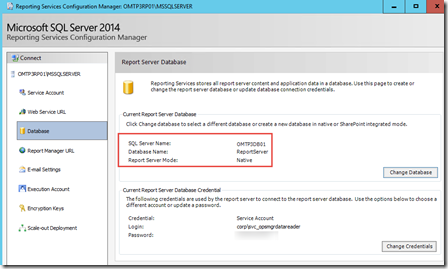
I launched the SQL installation and only installed SSRS. I then went through each page in the Reporting Service Configuration Manager and configured the SSRS instance. I created a new Reporting Server database on the main SQL server OMTP3DB01:
Install OpsMgr Reporting Server
I launched the OpsMgr installation wizard and selected Reporting Server. The only error I received was that the SQL Server Agent was not running. So I went to check the SQL Server Agent service on the SQL server OMTP3DB01, and realised I must have left the start type for SQL Server Agent service to the default configuration of Manual. I changed it to automatic and started the service. I was then able to continue on with the reporting server installation.
08. Configure a Remote Management machine
Now that I have all the OpsMgr components installed, I need a machine to remotely manage these components. For this purpose, I have created a VM running Windows 10 Professional and have installed the following components:
- OpsMgr 2016 Tp3 Console
- SQL Management Studio (from SQL 2014 with SP1 install media)
- Windows 10 Remote Server Administration Tools (RSAT)
- IIS Manager for Remote Administration
The installation for all of these components are very straight forward, except for the IIS Manager for Remote Administration. I will only go through my experience for this one here.
Install IIS Manager for Remote Administration
On the client OS (Windows 10 in this case), if you install the IIS management console, you can only manage the local IIS instance, not a remote IIS server. In order to remotely manage a IIS server, we must install the IIS Manager for Remote Adminisitration, as well as enabling the remote administration on the remote IIS server.
The IIS Manager for Remote Administration can be installed using Microsoft Web Platform Installer. And here’s a blog article for Windows 8 (which is still relevant now with Windows 10): http://tech-stew.com/post/2012/10/08/How-to-install-IIS-remote-manager-in-Windows-8.aspx
When I downloaded and launched the Web Platform Installer, I was able to see the IIS Manager for Remote Administration:
However, somehow the installation failed (twice). When I checked the installation log, I found the downloaded msi failed signature verification.
After I manually deleted this file from the temp folder and installed again from Web Platform Installer, it failed again. So I manually ran the downloaded msi file from the temp location, and it installed successful. I was able to see the option to connect to a remote IIS instance on my Windows 10 machine:
Configure IIS for Remote Management
As I mentioned, I also need to enable IIS remote management for the web console server. To do so, I need to install IIS management service on the web console server (which I did not install when I installed IIS). This can be done using PowerShell:
Install-WindowsFeature Web-Mgmt-Service
Remote Management can then be enabled via a registry value. The dword value “EnableRemoteManagement” in “HKEY_LOCAL_MACHINE\Software\Microsoft\WebManagement\Server” must be set to 1. You can do so using PowerShell, or using regedit from the remote machine (via Remote Registry service):
After updating the registry value, start the WMSVC service:
Then I was able to connect to the web console IIS server from the Windows 10 machine:
09. Verifications
I launched the OpsMgr console, checked the management servers and deployed the agents on all other computers mentioned in this blog post:
And tried to run a report:
Everything seems to be OK (with my limited testing so far).
Conclusion
In this post, I have documented the steps I took to setup OpsMgr 2016 TP3 on Windows servers using the minimum required GUI components. This is 100% based on my own experience in my lab. Please use it with caution and I will not hold any responsibilities if anything went south in your environment. Please also feel free to contact me if you have anything to add on this topic, or simply want to share you experience.








Leave a comment